One of the many hot topics of late is supply chain security. In the interest of having security be a part of the equation as early as possible, or “shifting security to the left”, ensuring the integrity and identity of who is commiting changes to your internal code bases is critical. Whether you have internally developed applications and microservices or just infrastructure as code repositories, ensuring only authorized users are making changes is a key component to securing your internal supply chain. One great way of doing this is by forcing contributors to cryptographically sign their commits via GPG and hardware tokens.
Understandably, GPG is considered a bit unweildy, but hopefully this guide will make the process a bit easier to understand and implement.
Prerequisites:
- A Git based code repository (Github, Gitlab, etc)
- A new hardware token that supports GPG keys such as a Yubikey 5c (recommended)
1. Install GPG for your operating system
- MacOS -
brew install gpg - Linux -
apt install gnupgoryum install gnupg - Windows - Download and install Gpg4win
- Verify installation by running
gpg --versionfrom a terminal
2. Install utilities for your hardware token. Since I’m using a Yubikey, I’ll be using the ykman utilities
- MacOs -
brew install ykman - Linux -
apt isntall yubikey-manageroryum install yubikey-manager - Windows - Install the Yubikey Manager
- Verify installation with
ykman --version(NOTE: Windows users will need to navigate to the directory to runykman)
3. Generate PIN’s for Yubikey.
Yubikey’s have 2 PIN’s, a user PIN, and an admin PIN which is also called a PIN Ublock Code or PUK. By default, the user PIN is 123456 and the admin PIN/PUK is 123456578.
- With the Yubikey inserted into the system, run
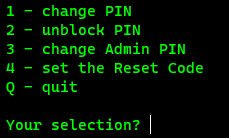
gpg --edit-cardfrom a terminal. You should see something similar to this:
- Your prompt should now read
gpg/card> - Enter admin mode with the
admincommand
- Enter
passwdto being setting custom PINs
- First change the admin PIN/PUK by select option
3 - A window will appear prompting you to enter the existing admin PIN and then asking you to enter the new PIN twice.
- Select option
1to change the user PIN. - A window will appear promopting you to enter the existing user PIN and then asking you to enter the new PIN twice.
- Quit the PIN change menu by entering
q
4. Configure Key Size on Yubikey
I’ll be generating keys based on the RSA standard since that still has the broadest compatibility.
- First, I want to enforce a 4096 bit key for all types of encryption keys. Enter the
key-attrfrom thegpg/card>prompt.
- Select option
1for RSA - Enter
4096at the prompt - You will be prompted for you admin PIN/PUK. Repeat these steps for each type of key (encryption and authentication)
5. Generate GPG Key on Yubikey
- From a terminal make sure you are at a
gpg/card>prompt by enteringgpg --edit-card - Enter admin mode with the
admincommand - Generate keys by entering the
generatecommand. When asked about making an off-card backup I typically say no, but this is up to you and your threat model. - You will be prompted for your user PIN, followed by a key expiration period. Choose an expiration time that you’re comfortable with, but remember, the private key is stored on the hardware token making key exposure exceptionally difficult.
- Provide your name and email so the key is associated to you when used.
- Confirm your entries, and then watch the light on the Yubikey blink like Las Vegas for a while as it generates the keys.
- Once complete, quit out of the
gpg/card>prompt with thequitcommand.
6. Require touch on Yubikey
Requiring a physical touch on the hardware token ensure that if a malicious actor gains remote control of your system while the token is inserted, they still will not be able to utilize it.
- Enter the following commands from a terminal to require a touch for each type of key usage. (NOTE: Remove your token and reinsert it if you just generated fresh keys)
ykman openpgp keys set-touch sig fixedykman openpgp keys set-touch aut fixedykman openpgp keys set-touch enc fixed
- You will be prompted for your admin PIN/PUK after each of these commands along with a confirmation.
7. Export public GPG key and add to user profile
- Export your GPG key with the following command
gpg --export --armor <email address>using the email address your setup the key with
- Copy output of the command including the header and footer
- I’m using Github for my repositories, so I’ll go to my account settings, and then SSH and GPG keys.
- Paste the GPG key block including the header and footer into the key and give it a unique name.
- If you want, enable Vigilant mode, but be aware that this will flag all over your previous commits as unverified.
8. Configure Git client to require touch
- Run
gpg --list-keyswith your hardware token inserted - Copy the long number that is listed in the output
- Run
git config --global user.signingKey <copied data from previous command> - Run
git config --global commit.gpgSign true - Run
git config --global gpg.program gpg(NOTE: Windows users will need to replacegpgvalue withC:\Program Files (x86)\GnuPG\bin\gpg.exe)
9. Enforce signed commits on repository
In Github, requiring signed commits is a per repository setting (at least with free accounts)
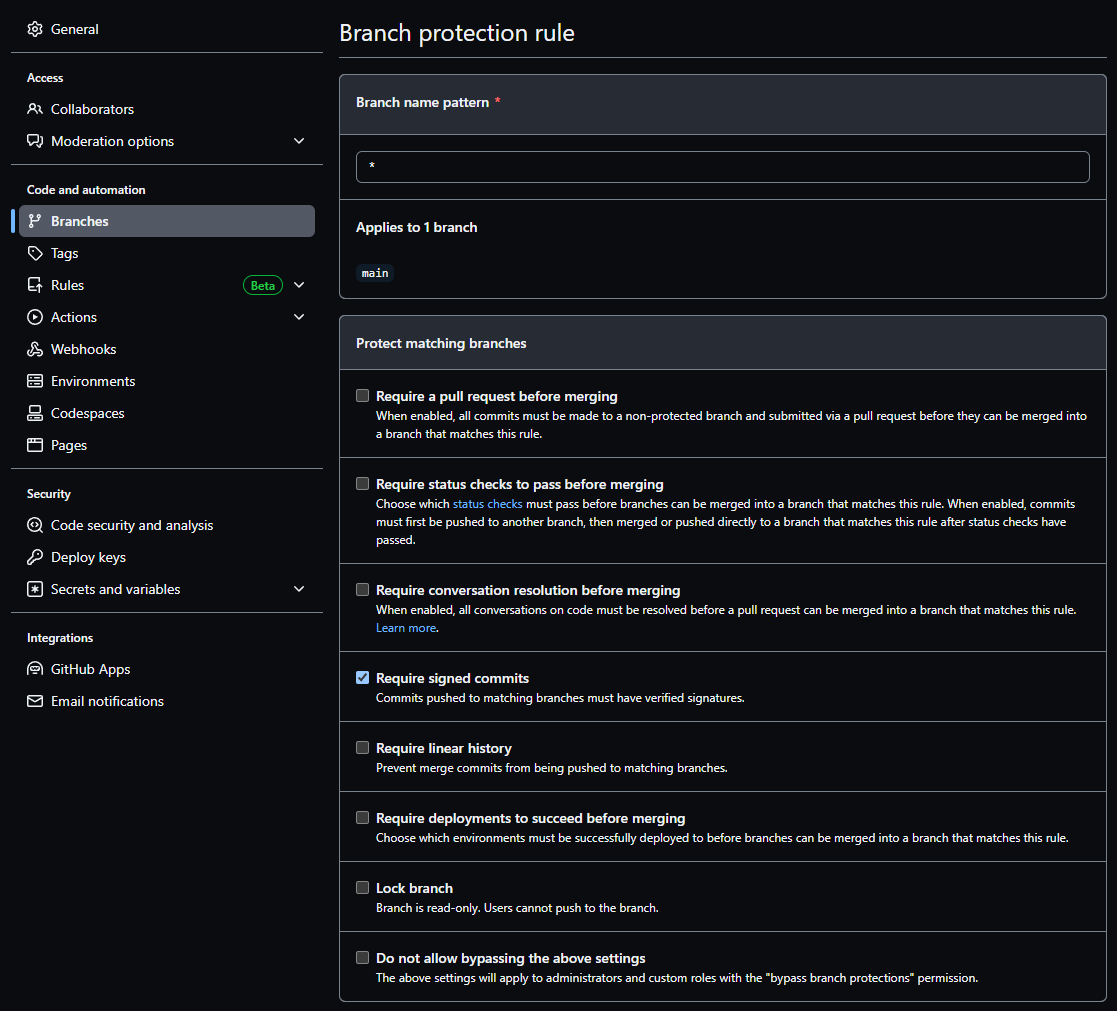
- Navigate to your repository and go to settings
- Under Code and Automation, select Branches
- Click the button for “Add branch protection rule”
- Enter a pattern for which branch or branches you want this to apply to. For all, enter
*, or the names of branches such asmain,dev, etc. - Select the checkbox for “Require signed commits”

- Click the “Create” button at the bottom of the page.
Ta Da! If everything has gone according to plan, you now have a shiny new GPG key stored on a hardware token that requires a physical interaction to use in order to sign commits to a software code repository. You can now ensure a high level of security at one of the earliest stages of your internal software supply chain.
If you have any suggestions to improve this or have any questions, feel free to reach out!